


نقد و بررسی
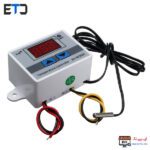
- ولتاژ کاری:12 ولت
- بازه اندازه گیری دما: از منفی 55 تا 110 درجه سانتی گراد
- درصد خطا: یک صدم
- سنسور اندازه گیری دما ضد آب
- جریان قابل تحمل رله: 10 آمپر
- نوع سنسور: NTC
- اهم سنسور: 10 کیلو اهم
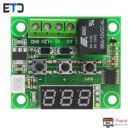
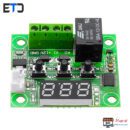
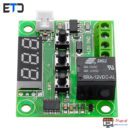
ماژول ترموستات یا دماسنج
از این ماژول با کیفیت و مقرون به صرفه برای کنترل دمای برای وسایل برقی استفاده می شود.به وسیله های دکمه های موجود بر روی ماژول،بازه ی قطع و وصل مشخص شده و سپس از طریق NTC موجود که به عنوان دماسنج عمل می کند،دما اندازه گیری شده و سپس به آی سی دما را ارسال کرده و آی سی اقدام به قطع یا وصل دما می کند.
ویدئو ماژول ترموستات یا دماسنج:
ولتاژ کاری این ماژول ماژول ترموستات یا دماسنج 12 ولت بوده که از طریق باتری یا آداپتور قابل تامین هست.غلاف فلزی موجود بر روی ماژول 1208 نیز تا عمق 0.5 متر ضد آب می باشد.

نحوه ست کردن ماژول ترموستات یا دماسنج:
دکمه ست را چند ثانیه فشار دهید تا وارد منو ست کردن شوید:
P0:تعین مد کاری سرما یا گرما.
P1:تنظیم حساسیت یا هیستریسیس یعنی با چند درجه تغییر فعال شود.(این عدد با دما جمع بسته شده)
P2:حد بالای دما که باید کمتر از 110 درجه باشد.
P3:حد پایین دما که باید کمتر از منفی 55 باشد.
P4:کالیبره کردن خود ماژول که از ویژگی های مهم این ماژول هست
P5:زمان تاخیر قطع رله(یعنی با گذشت این مقدار،اگر رله فعال باشد قطع می شود.)
P6:حالت اخطار دما که با تنظیم کردن آن آلارم روشن می شود.
با فشردن همزمان کلید مثبت و منفی به مدت بیش از 5 ثانیه،ماژول ریست می شود.
ویژگی ها ماژول ترموستات یا دماسنج:
- ولتاژ کاری:12 ولت
- بازه اندازه گیری دما: از منفی 55 تا 110 درجه سانتی گراد
- درصد خطا: یک دهم 0.1 سانتی گراد
- سنسور اندازه گیری دما ضد آب
- جریان قابل تحمل رله: 10 آمپر
- سایز: 48 در 40 میلی متر
- نوع سنسور: NTC
- اهم سنسور: 10 کیلو اهم
- جریان استاتیک: 35 میلی آمپر
- زمان تاخیر: 0.1 ثانیه

ماژول ترموستات یا دماسنج
XH-W1209 DC 12V Thermostat Temperature Control Switch Thermometer Controller With Digital LED Display
Description:
This module allows the temperature control in ON / OFF mode, has a relay which is responsible for controlling the power of the load, such as an electric resistance. The temperature sensor is a 10K ohm NTC thermistor which has a coating that allows you to immerse the sensor into the water.
To set the control temperature press the SET button, with the PLUS BUTTON button you can increase and with the BUTTON REDUCTION button decrease the temperature control point, once the temperature has been set, press the SET button again to confirm.
Characteristics:
– Temperature control range: -50 ~ 110 ° C
– Resolution: -9.9 to 99.9 is 0.1 ° c, 1 ° C oscillates for other temperature range
– Accuracy of measurement: 0.1 ° C
– Precision control: 0.1 ° C
– Hysteresis accuracy: 0.1 ° C
– Update frequency: 0.5 s
– Input power: DC 12V
– Measurement inputs: NTC (10 K 0.5%) waterproof sensor 0.5 m
– Output: 1 channel relay output, = 10 A
– Environmental requirements: -10 ~ 60 degrees Humidity 20% -85%
– Size: 48 (l) * 40 (w) * 14 (d) mm
– Power consumption: static current: <= 35 m a, <= 65 m A
SPECIFICATION:
Temperature Control Range: -50 ~ 110 C
Resolution at -9.9 to 99.9: 0.1 C
Resolution at all other temperatures: 1 C
Measurement Accuracy: 0.1 C
Control Accuracy: 0.1 C
Refresh Rate: 0.5 Seconds
Input Power (DC): 12V
Measuring Inputs: NTC (10K 0.5%)
Waterproof Sensor: 0.5M
Output: 1 Channel Relay Output, Capacity: 10A
Power Consumption:
Static Current: <=35mA
Current: <=65mA
Environmental Requirements
Temperature: -10 ~ 60 C
Humidity: 20-85%
Dimensions:
48mm x 40mm x 14mm
Settings Chart:
Long press the “SET” button to activate the menu.
Code Description Range Default Value
P0 Heat C/H C
P1 Backlash Set 0.1-15 2
P2 Upper Limit 110 110
P3 Lower Limit -50 -50
P4 Correction -7.0 ~ 7.0 0
P5 Delay Start Time 0-10 mins 0
P6 High Temperature Alarm 0-110 OFF
Long pressing +- will reset all values to their default
Displaying the current temperature:
The thermostat will display the current temperature in oC by default. When in any other mode making no input for approximately 5
seconds will cause the thermostat to return to this default display.
Setting the trigger temperature:
To set the trigger temperature press the button marked ‘SET’. The seven segment display will flash. You can now set a trigger
temperature (in oC) using the ‘+’ and ‘-‘ buttons in 0.1 degree increments. If no buttons are pressed for approximately 2 seconds the
trigger temperature will be stored and the display will return back to the current temperature.
Setting the parameters:
To set any parameter first long press the ‘SET’ button for at least 5 seconds. The seven segment display should now display ‘P0’. This
represents parameter P0. Pressing the ‘+’ or ‘-‘ buttons will cycle though the various parameters (P0 to P6). Pressing the ‘SET’ button
whilst any of there parameters are displayed will allow you to change the value for that parameter using the ‘+’ and ‘-‘ buttons (see
below). When finished setting a parameter press the set button to exit that option. If no buttons are pressed for approximately 5 seconds
the thermostat will exit the parameter options and will return back to the default temperature display.
Setting the cooling or heating parameter P0:
The parameter P0 has two settings, C and H. When set to C (cooling) the controller will turn on the cooling system to drive the
temperature down to the trigger temperature. Once at this temperature the controller will turn off the cooling. When the temperature
drifts back to the set point + hysteresis (see parameter P2) the controller will turn the cooling system back on.
When set to H (heating) the controller will turn on a heater to drive the temperature up to the trigger temperature. Once at this
temperature the controller will turn the heating off. When the temperature drops back down to the setpoint – hysteresis (see parameter
P2) the controller will turn the heating system back on.
XH-W1209 Setting the hysteresis parameter P1:
This sets how much change in temperature must occur before the relay will turn back on after reaching the trigger temperature. For
example, when in heating mode, if set to the default 2oC and the trigger temperature has been set to 25oC, it will not re-energise the
relay until the temperature falls back below below 23oC (25oC – 2oC). Setting this hysteresis helps stop the controller from continually
triggering when the temperature drifts around the trip temperature.
Setting the upper limit of the thermostat parameter P2:
This parameter limits the maximum trigger temperature that can be set. It can be used as a safety to stop an excessively high trigger
temperature from accidentally being set by the user.
Setting the lower limit of the thermostat parameter P3:
This parameter limits the minimum trigger temperature that can be set. It can be used as a safety to stop an excessively low trigger
temperature from accidentally being set by the user.
Setting temperature offset correction parameter P4:
Should you find there is a difference between the displayed temperature and the actual temperature (for instance if the temperature
probe is on a long run of cable) you can make minor corrections to the temperature reading with this parameter.
Setting the trigger delay parameter P5:
This parameter allows for delaying switching of the relay when the trigger temperature has be reached. The parameter can be set in one
minute increments up to a maximum of 10 minutes.
Setting the high temperature alarm parameter P6:
Setting a value for this parameter will cause the relay to switch off when the the temperature reaches this setting. The seven segment
display will also show ‘—‘ to indicate an alarm condition. The relay will not re-energies until the temperature falls below this value. The
default setting is OFF.
0دیدگاه